Tuesday, March 21, 2023

"There is a lot of Magic in a (Model) Railroad"

Hello everyone!! Been a while for a proper post here. Long story short a lot of personal and family things have happened that have left little time for model railroading and posting on the blog. But I am finally getting around to do it and oh boy it’s a big one. So, if you find this post interesting, please do leave me some feedback it would be greatly appreciated. Anyways on the meat and potatoes. 

     Back in September I took a trip down to Walt Disney World hoping to get a glimpse of our beloved “Grand Circle Tour” once again. For reference I have not been able to ride the WDWRR since October of 2018. I know that doesn’t seem long but that’s now over 5 years!! In which time I have been to WDW on at least 5 occasions. Needless to say, was missing the sights and sounds of the railroad. WDW wasn’t the same without hearing the whistle of the steam trains around the park.
I have many pictures with this sign....

    Sadly, for me I would not be lucky again and I returned home a week before the railroad started cast member testing. Although I can be happy with the fact that since this trip and as of the posting of this blog the WDWRR is back up and running with 3 of the 4 locomotives. (4th still out for refurbishment) Now I may not have seen the railroad running in person but it did motivate me to pick up on my HO scale WDWRR project.
WDWRR #1 & #3 in the process of disassembly.

    The original project started back in 2015. I was still in college and on weekends and school breaks I worked on converting 4 old Tyco/Mantua 4-6-0’s into the 4 engines of the WDWRR. This attempt at scratch building was not only my first attempt at a lot of new modeling techniques but use a lot off my very limited time, budget and novice skills. The models came out ok. I was proud of them then but looking back now they are a bit embarrassing. Their last public appearance was at the 2022 NERPM meet as a way of showing my progression of a modeler. Compared to my 3025 (version 1 R.I.P) & 0901 they were very crude. Since this original attempt; my time (to a degree) budget and skills have improved and I wanted to elevate these models to the level of my other models. This upgrade technically started in 2020 when I started to 3D model a more accurate cab. This model was created using measurements from the MTH 10-wheeler locomotive and scaling reference photos in a modeling program. (Remind me to talk about the MTH trains another time, very interesting story!) This model had its issues as well but it was easier to fix and would be worth it in the end. Next came the Boiler. The Basic shape is actually very simple but the challenge was trying to be as accurate/ prototypical as possible while still allowing for the original motor and frame. I say “prototypical” but I am already cheating as these engines are 3 ft. narrow gauge in real life and I am modeling them in true HO scale. So, they are as “prototypical” as I can be within reason.
(L to R) Original, 3D v1, v2, v3

    The photo above shows the evolution of the boiler. The furthest left is the original; stock Tyco shell with some Bondo to help smooth out the tapered boiler sections. The second is v1 of the 3D printed boiler. This version included a modeled boiler, boiler bands, smokebox and detailed back head and cab details. In the original Tyco model this was on a separate plastic piece that would stick out the back of the cab. The Disney engines controls and fire box stop about halfway through the cab, so I modeled it the “correct” way. This however pointed out a problem which we will discuss later. 

    v2 improves the design by adding the stepped section to the cab, lowered fire box, handrails air pump bracket and the back frame which attached to the original models frame in a similar way. This was almost perfect except for the hand rails. They where too thin and failed often. (Might try these again but might become a separate item.) Finally, the last, v3, is the same as v2 but with drill holes for the handrails rather than including them. Now remember that little issue I mentioned before about the “accurate” back head location? Well, the reason the original Tyco model had this as a separate part and for its length was to allow room for the original motor.
Original Tyco/Mantua motor scale.

    This motor is gigantic in relation to the model and would be sticking out of the boiler and almost to the roof of the cab. So, what am I to do? Admit defeat and modify or even remove the cab details to accommodate the motor? No, not this time. Besides I wanted to change out the motor for something more modern anyways. The issue was, where do I find one that could be useful to me? Faced with this task like this I turn to my go to parts shop. The Bachmann Trains parts store.

     Now I know some people have their opinions on Bachmann but their models have always been great runner for me and I find that their models host a wide range of motor designs. My first choice was from their 0-6-0 saddle tank engine as it has a smaller smooth running motor that could be hidden in the boiler. Unfortunately, this is discontinued and parts are not available. I then turned to some other little engines I have, Thomas and Percy.

    Cast your minds back to a previous post about turning these models into “dummy units”. Because of this I removed their motors. While they didn’t run, they provided me with a good size template for what’s needed.

 
Bachmann Percy Motor Test Fit.

    The motor would need to be angled to mesh with the original gear on the drive wheel. This angle was originally achieved by a metal frame that held the original motor at the angle needed. My solution was simple, but tedious. Design a cradle for the Percy motor that could be screwed into the frame. Well as my luck would have it, Bachmann updated their the Percy motor since my old model was made so I had make a cradle to hold the new motor. (Just ordered the remaining motors yesterday and they seems to have changed motors again). 

New Cradle installed.

    Despite this, the "new" motor worm gear meshed will with the original drive axel. Let’s hope the newest version of the motor does the same otherwise I'll need to become a bit more creative with my “heart transplant”. For now I am going to secure the new cradle to the existing frame using a ¼” 2-56 screw; a growing favorite of mine, along with a piece of electrical tape to help hold it in place. 

"New" Percy Motor In Cradle.

     The last body modification made to the original model was to remove the original cast cowcatcher. While close, it doesn’t meet my “realistic” design approach. So, with the help of a razer saw and a Dremel tool, off it went. 

Removing the old cowcatcher.

What follows this is a lot of 3D modeling and printing. During this time, I have created the two domes, smokestack, smokebox door, bell, whistle, air pump, cowcatcher and headlight. These pieces have all me test printed and primed but are not nearly complete. I am still working on the designs and I am waiting on a new type of resign. The company claims it will reduce layer lines visibility and be possibly faster and stronger prints. But only time will tell. 

Test fit of the WDWRR#1 3D printed parts.

    In the mean time I am very happy with my progress and I hope that I will move onto the painting phase. I am excited to see this project turn out and I'll be sure to keep you all posted on any future updates. But till then, Ill borrow the words of a certain mouse. See ya real soon!!

Friday, July 29, 2022

Update on NH Deluxe Coaches, Smokers and Combine Coaches and the Workshop.

 Hello Everyone,

This is the first update on the first collaboration between Randy, Myself and John Green of Bethlehem Car Works.

See my previous post as well as Randy's for background on the project. The 3D modeling has been completed since the New England/Northeast Prototype Modelers Meet and sent out for production tests. This is very exciting because it really make this real. Something that I have created on my own laptop is going to be a part of a serious model railroading company. 

With hope the models will be completed in time for the NHRHTA Reunion/ train show on September 10th. Sadly I will be missing this because of a prior event. but for those interested in attending, one of the best parts of this show is that its located inside the River Valley Junction Building at the Essex Steam Train & Riverboat in Essex, CT.  So please come down to see the models and help support our hard work as well as take a ride along the Beautiful CT river valley.


The other news I have is regarding the workshop itself..... IT HAS BEEN UPDATED!!

First off, I added more power outlets in key locations. (This was an adventure to pull a permit, install on my own and pass inspections.) Thankfully all is passed and I wasn't shocked too bad!!! (Kidding)

Regardless this allows me to have dedicated electrical circuits for the modeling CPU, my paint booth, and most importantly the 3D printer station.


That's right, your eyes are not fooling you!! There are a few more toys to play with here. Pictured above from right to left to right is as follows:

Top Shelf: Anycubic Photon S ( Original Printer), Anycubic Wash and Cure Station Plus, Anycubic M3 Max.

Bottom Shelf: Homemade UV curing Chamber, Dremel 3D20 PLA Printer, various cleaning and printing supplies.

Stuff on the bottom shelf are nothing new. These were some of my first printers, support equipment and supplies. The top shelf is were the fun is. Starting with the most impressive item, the M3 Max. Thanks once again to Randy We were able to order this printer for future modeling projects. (stay tuned for more!)  But the new printer is amazing! it has a corner to corner measurement of 13.5 inches. Meaning that we will eventually fit a full HO scale Pullman car in one piece. Lets the imagination run wild!!

Which brings us to the Wash and Cure Plus. This is filled with a cleaning solution that will clean off printed parts in minutes. Once parts are clean the interior bucket can be removed and built in UV lights will cure the parts. It will greatly help the post printing process. 

I have a few test prints in mind and I cant wait to test the limits of the new machines!!  Post more soon but till next time see you all real soon!

Wednesday, June 15, 2022

Post NERPM Meet Report & Major Project Announcement!!


Finally getting a chance to sit down and write down my thoughts on my first ever NERPM meet. That combined with a minor surgery the following day the last few days have seemed like a whirlwind. Good news all is that I am on the road to recovering and some time off work lets me fully gather my thoughts on this experience and also finally elaborate on a major project I am apart of. But first let’s talk about the preparing for the show itself.


I spent the week before working late into the night to try to complete as many projects as I could or at least to a point where I was happy to present them. Some of you may have seen on my Facebook group that I had another minor injury towards the end of the week. Once again please be very careful when using superglue (CA) with the accelerator. Part of the skin was thorn off when trying to properly clean the glue off and it really caused some damage. Because of this I was lost two days of work hauling most of the projects I wanted to work on. Meaning that I was not able to finish 3025’s replacement parts nor getting all of 0901’s paint work complete.  The other minor setback came in the way of my Anycubic Photon S’s LCD screen cracking. This put the printer out of action and made me have to make due with parts I had already created. Not the end of the world but combined with the finger injury was a soar note on the whole process. Thankfully my finger is healing and a new LCD screen arrived in the mail today, so both issues will soon be in the past.

I set out for the show Friday Morning and arrived around 7:45 am to check in and start setting up my models.


My Section of Display Table. Chris Adams to my Right


In addition to 3025,0901, FVRR PRR Caboose, and Strasburg Thomas; I also decided at the last minute to bring my older Walt Disney World Railroad Models in a way to show my progression as a modeler. These WDW models were some of the first I made in my college dorm room no less which meant I had very limited tools and supplies. Looking back at them I’m a little embarrassed by their overall craftsmanship but they will soon have their time to reenter the workshop for their overhauls. Still, they did manage to get some positive reaction from some of the meet attendees which make me feel good. I also had painted example of my VRR/NH Mile Markers and W, A & R post. Additionally, as a last-minute decision I brought up some older failed test prints of the L&NE wooden gondola and HT&W snowplow. In my mind these was a good collection of my work and by far was the most colorful and whimsical collection at the show.

                The show was held at a La Quinta Hotel in Springfield, MA just north of the Springfield Train Station and I booked a night to make sure I didn’t miss anything. 

Obligatory Railfan Picture of the Station 

Good thing I did as Fridays event didn’t end till past 10:30 pm. The hotel’s convention/ballroom space was located on the top (12th) floor which was a little weird seeing as most hotels have this on the first floors. From what I was able to gather there was some sort of round spinning restaurant that once used this space in the late 1970s but I’m not exactly sure. Regardless the room was spacious for many models display tables, vender booths raffle tables and white elephant tables.

Lou's Model OF LIRR No. 400, Once VRR 0800 and now at the CERM.
 
HO scale Rail Ferry

Railroad and modeling clinics were held almost every hour being held in conference rooms on the 2nd and 11th floor. Again, this was a bit problematic at times because of only 2 of the 4 elevators working. And actually, was the cause of me missing a part if not all of talks. The ones I was able to attend were very informative and inspired me to continue working on my models. The hotel room itself was also a bit dated but was at least comfortable and the included breakfast buffet was great. Overall, I’d give the venue a solid 6.5/10. Not the worst hotel ever but could use some updating and the entire elevator situation was annoying but manageable. Also seeing as this is my first event, I really have nothing better or worse to compare to.


Overview of the Room

Overview of the Room.

                Next up, another major reason I attended the event and I’m happy to finally be able to officially announce a major project I have been working on over the last few 
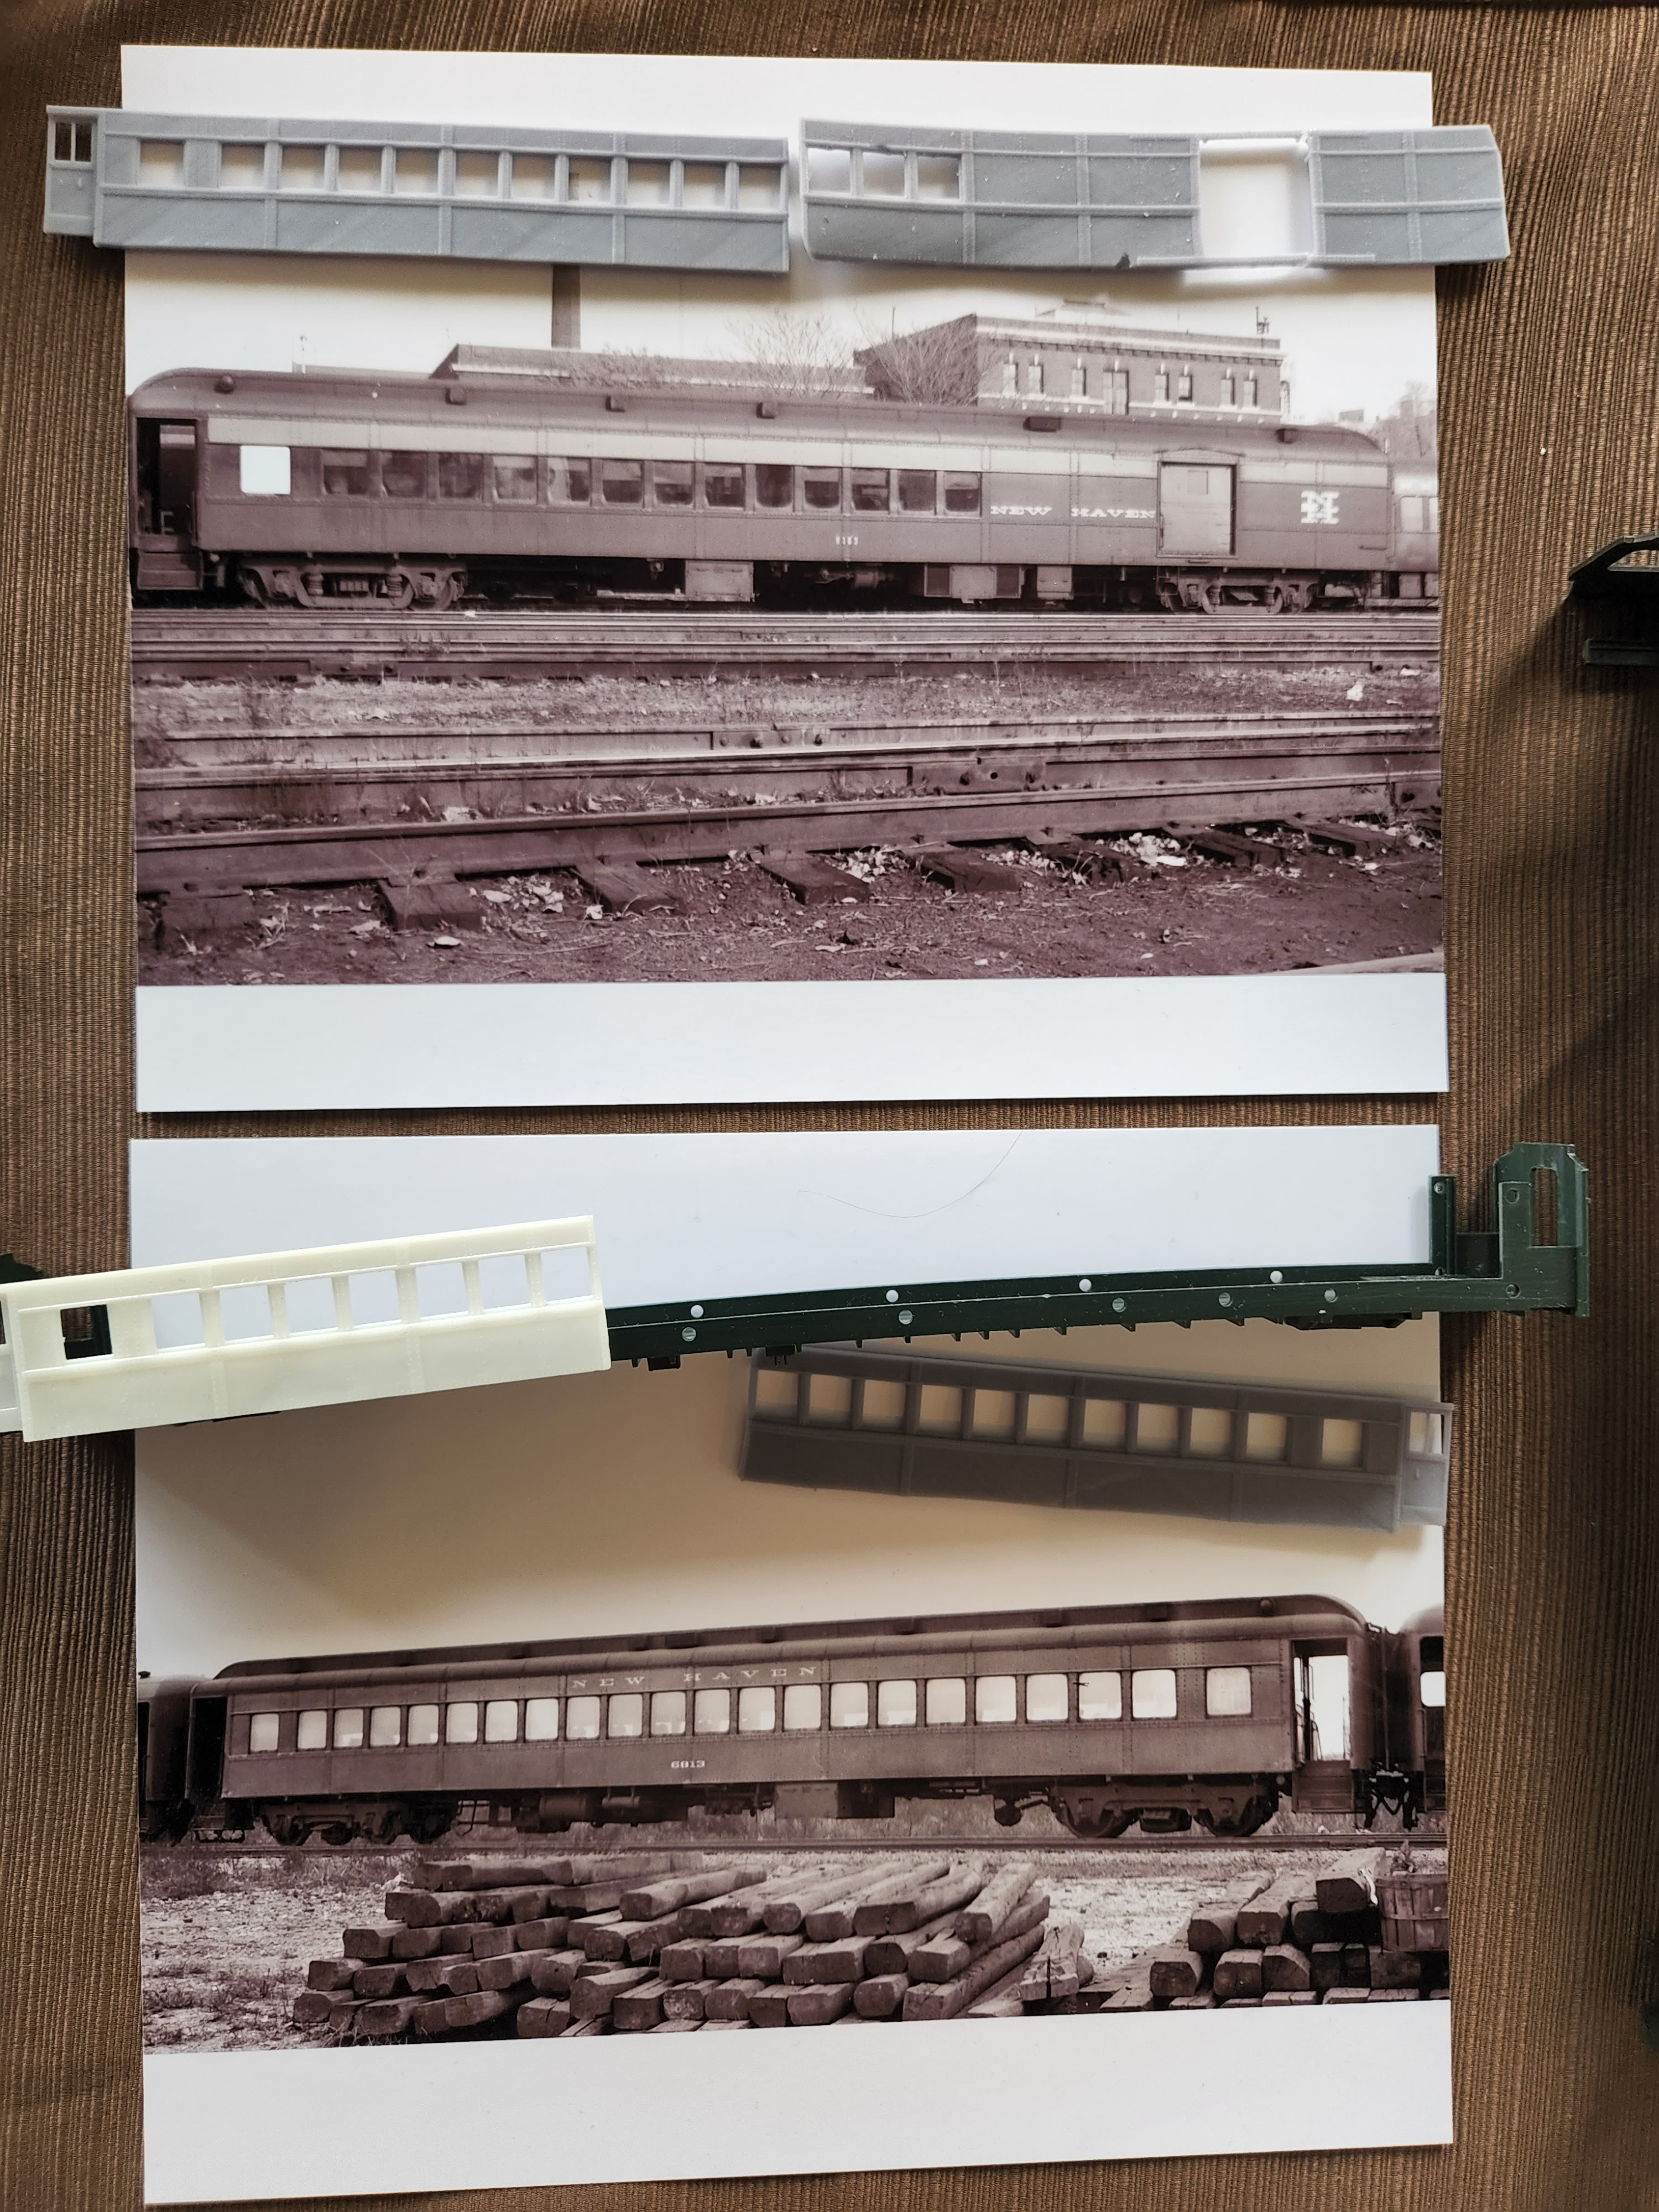
months!! During this time, myself and Randy Hammill, have been working together along with John Green of Bethlehem Car Works to create and produce kits of some New Haven Deluxe coach, smoker, and Combine cars. These kits, when produced will be made of resin sides that fit on existing Branchline coach cores. The side will be cast from 3D printed masters that I have created with help of Randy’s in-depth research. I am very excited to be apart of this team and use my skills to help create these products!! The NERPM was our first official announcement of the project and included 3d printed test prints on display along with reference photos and drawings. And now since the cat is out of the bag Randy and I will be making more regular post on our respective blogs about the progress of these models.  The hope and goal are to have some kits ready for the New Haven Railroad Historical and Technical Association’s model train show/ reunion later this September. And if this first batch of cars is successful, we are already looking to continue this project with additional cars based on some of the NH’s Pullman Parlor cars. Its all very exciting and I’m so happy to finally be able to share this with you all. I hope you find this as exciting as we do!!


Examples of the Combine and Deluxe Coach Cars


Finally, I wanted to share with you all the “haul” of items I picked up at the show. I bought 2 things and the rest I got very lucky with the two days of Raffles.

The show Haul and example of new Business Cards


From right to left there is a Bethlehem Car Works NH Heavyweight Diner Car, Ether the Dreadnought or John Bertram the cars found of the Yankee Clipper. A Lasor cut Station Kit of Southampton Station, Which I won Friday night in the Raffle by being the only one to put a ticket in the bag. A Scale Trains beverage holder, Free. Two packs of Micro Trains N scale US army Humvees, again won by being the only one to bid on them. A Walther’s Trainline Eire-Lackawanna SW8 Switcher, which was one of the craziest wins as I only entered one ticket in and won!!  There were a few items I missed out on which was slightly disappointing but Ill take what I got and for only spending $25 on tickets I think I made out fine.

 Last but certainly not least, in my opinion, the best items I got at the show was a HO scale laser cut wooden model of Essex Station!! It was the first thing I found on the White Elephant tables and held onto it until it was open for business!!  Sadly, I don’t believe it is a full kit but It’s still a win in my mind as I can use the parts I do have to as a base to create other replacement parts. And having the kit in hand is already giving me ideas on building a small diorama of Essex Station to place 3025 and 0901 in front of.

And that’s about it for my report. Overall, I had a great time with the show and am looking forward to more in the future. Thank you to all of the friends that encouraged me to attend the show and for making the show itself very enjoyable. (Chris, Bill, Randy, Kaylee, Lou just to name a few) I hope you also enjoyed my recap and are looking forward to the next adventure here at the workshop. Till then see you real soon.


Wednesday, May 25, 2022

2022 NERPM Initial Fears and Preparations

We are a little less than 3 weeks away from the 2022 New England/Northeast Railroad Prototype Modelers meet and after some serious debating I have decided to sign up to attend. 

As stated many times before here, I personally don't consider myself a "Prototype modeler" compared to others. I am more of the mind set of If I'm happy with the result, then I'm not going to worry too much what others think. However, I'd be lying if I didn't admit that its reassuring that others find my work interesting and detailed as well. Some can call this ego boosting, but to me it means that the level of detail I hold my models to is at least on a slightly higher level then I originally my have thought. Which brings up the reason why I was in such a debate with myself about attending and showcasing some of my models. 

The fear of being overshadowed or worse, being belittled for a lack or detail was daunting. Now I know that this would not be the case but still weather it was fear of being subpar or looking like a novice among other modelers was a real concern. 

What really helped push me to eventually sign up was mainly the support from a few friends during a few model railroad operating sessions.  The comments and encouraging words really helped calm my nerves and helped me build more confidence in my abilities as a modeler. Plus, Its ok for different people to have opinions on what we consider to be "good" or, heck, even what is considered "prototype modeling" in this hobby. But enough about past fears lets move onto more exciting topics; What will I be brining to the show!?!?!

Now its no secret that I have been posting very little in means of both the Blog and FB page. This is unfortunately due partially because of some medical things combines with daily life tasks that always seem to get in the way of playing with trains. However, when I have gotten some free time to model it has been mainly focused on some very exciting 3D modeling/printing projects. Some items I cant go into great detail yet, but can very soon!!!(You might even get a sneak peak if you happen to find me at the show …..hint....hint😁)

But while I wait for some of those items to print (averaging 6+ hour per part), I have been brainstorming what Id like to display at the show. One of the first items on my list was my model of VRR 3025. Almost becoming my poster model on the blog, it was a easy choice. The issue was that it has encountered some issues during the past few months. Nothing mechanical, but the cab and tender have had some parts break off and with the nature of the 3D printer parts it was better to reprint them and start fresh then attempt to repair any damage.  


The next item was VRR 0901. My second "masterpiece" has been sitting on the workbench for over a year in primer, waiting for me to hit it with a few coats of NH warm orange and Hunter Green. Still not sure if I will have it fully painted before the show but rest assured it will be on display. 


Next items on the list were actually featured in last weeks "Wordless Wednesday". Attached to the blue painters tape are a set of my NH/VRR trackside posts. They have been seen in their painted form on friends layouts in he past but I personally never made a set my own. So these, the Mile Markers and 1920s era R.R. Crossing Signs will be on display.  To the right is something I'm not 100% sold on but still may bring it for fun. These are the original 4 person railbikes found at the VRR. These were made quickly last summer after a weekend full of operating the 1:1 scale counterparts. They don't roll well so they may become a stationary piece used for display and not be operational as originally designed.


Finally the last major item in last weeks post is my first model of a HO scale tank engine and knowing my past it oh course had to be a certain blue tank engine. So why am I bringing this model, especially to a show designed around showcasing models of "Real" railroad equipment. Simple this model is based on a actual prototype, former Brooklyn East District Terminal #15, more commonly known today as Strasburg's live steam replica of Thomas. 

    I haven't talked about this model in great detail yet; but for some background, it will be riding on a Bachmann 0-6-0 saddle tank switcher body. I swear its almost, if not, the same basis as the original #15 locomotive. Thomas and the trackside items are currently in the spray booth waiting for me to finish mixing the paint but this wraps up the core items I'm planning on bringing to the show. I may add more depending on how much free time I have.....which will be hard because Thomas and Percy will be visiting Essex for the next 2 weekends. Which means I'll be down at the Valley more often. 

Regardless I'll end this post with a few questions to you, the reader. Is there anything else I should bring? (finished or in progress) 

Is there anything from my past posts or Shapeways store you would like to see in person?  Let me know and I might be able to get some ready in time!! If I don't follow up before then, I hope to see some of you at the show and look on FB for more update photos as we get closer to the event.


Monday, March 14, 2022

Monday Modeling Update - Slight Buyers Remorse - March 14th, 2022

 Over the last few months there has been a lot going on in and out of the workshop. There have been some field trips to fellow model railroaders, Bob Murphy, Chris Adams and Bill Schneider home layouts for some amazing operating sessions. Some 3D modeling projects, some of which were seen on my Facebook page, some not shown yet!

However by far the most time consuming task taking most of my time recently is the result of a very impulsive eBay win. 


The listing was for 6 HO scale locomotives, 4 of them Bachmann Spectrum models. Now say what you will about Bachmann Engines. I have always been a fan of the company since first starting in the hobby. To me they were a very good middle of the road manufacture that had very decent steam locomotives for under $300 dollars.  Making them the perfect gateway locomotives for me into DCC and kit bashing. 

I won the bit for around $200 at the end of the day which was a bargain in my eyes. Especially since the 4 Bachmann engines would be roughly $700-$800 new. Now I knew the seller stated that the models were in need of repair and most if not all of the decoders were removed. Not the end of the world since 2 of the engines might be cannibalized for future projects. 

However when they arrived it became clear that the locos were in much rougher condition. Not only were the decoders removed but most to all of the wiring was as well. Plugs were missing and/or destroyed.  So started my journey of taking each one completely apart and basically rewiring all back to DC operations. Oh did I mention that all of the headlights were burnt out LEDs..........................

Wednesday, September 29, 2021

Pushing the Limits of 3D Printing.

Long time no post.  Hopfully this is the start of more posts and updates as some personal things get wrapped up and there is more time for model railroading. Im still working on my Valley History Project but It was nice to be able to break up the work by having different things to focus on. 

The latest thing that has grabbed my attention is another request from fellow modelers and the project will and still is pushing the limits of my 3D Printer.

The request came in a few weeks ago. Looking for a replacement part for a Atlas S-1 diesel locomotive. Specifically for the ones used on the New Haven (For the DEY-3).


Hard to see but the grill in question is located under that metal walkway and above a large fan unit.  The Atlas models come with a metal grid, almost fence like, detail piece to simulate the grill. On the NH these grills were actually a series of shutters, very similar to the one found on the side of the locomotive's hoods.

The bad news for the project was that there was little to no reference photos to help base a model after. The good news is that we had a small team working together to discuss and develop the model based on small bits of information we all had/could find.  As one put it " it took a village" to design a part no bigger than 13mm square.

By far the best tool we had to design this model was the locomotive itself. This allowed us to get the base outer dimensions which is arguably the most important needed to start designing. The other tools were reference photos and a bit of guess and checking. From photos I was able to make a guess that there were about 22 shutters in total. 

Using this I started to create my first model using 0.015 thick fins and reducing the shutter count to 20 in an attempt to have prototypical gaps between fins. They were also angled at about 45 degrees to simulate that the fan is running but not at full throttle.


The 2 grills on the right were the first print attempts and while looked nice and prototypical count wise, were too small for my printer to actually provide gaps in-between them. Of course we could have planted a flag and called it done, but that urge to find a way to have both elements pushed me further. Which in tern lead the the examples on the left. Same size shutters but reduced to only 16 count.This allowed the gaps to be viable but looked more like a storm drain rather than a series of shutters. 


Here are the same two with a quick black wash and placed on the actual model. Notice how much nicer the one on the right looks compared the left. However what was found next really pushed me to create a happier mix of the two.


Above is a picture of an actual grill we are trying to create. This photo helped answer so many unknowns that it pushed me to create one more version (V5.0 by this point). 


Which brings the story to the present. Above is the latest test prints and as you can see they are closer together and have better gaps. The lower right one had some errors but one can argue that its seen a bit of weathering like the prototypes. Im sure we are not complete with these grills so stay tooned for more updates and future project.!


Tuesday, August 10, 2021

HO scale 3025 Build Process

    Hello everyone, First I must apologize for the lack of posting here. As I have stated before I have been working primarily on a history project on the various types of equipment found on the Valley Railroad. What started as a simple series of articles has, for the better, turned into a full fledge book. I will go into more details about this at a later time but please now that more Model trains and 3d modeling will be coming in the near future. But as for today I thought it was finally time to update you all on my HO scale Valley 3025 project.


    I’ve mentioned before that this was my first true scratch building and semi rivet counter project. There are so many aspects of the hobby that I learned from this and am very happy with the outcome, but I know there is always room for improvement.

    As stated before, I started with a stock Bachmann 2-8-2 SY class Mikado, Susquehanna No. 142, to be exact. This is the best place to start if you would like to follow my process as about 60% of the work has been done by Bachmann. However, the biggest issue is what the other 40% entails. When Bachmann created their SY model they used the Chinese locomotives as the prototypes. Meaning that they are in their original configurations with the engineer on the left and firemen on the right; opposite what is standard here in the United States. This would also include their model of No. 142 as it is a glorified repaint of the base model for the American markets. The issue with this is that the actual 142 and 3025 were modified at Tangshan to be right hand drive before coming state side. Meaning that certain appliances and controls on the model are on the wrong side!!! So, in order to match the porotype 3025 I would need to revers the details, a task easier said than done.

     First step disassemble the model and start to remove details.


This included the reverser, air pumps, automatic lubricator, what I believe is the throttle piping and headlight. (I can be 100 % wrong on these items names) Be careful to not loose screws and parts during this process and hopefully you don’t have the same issue I did and find that screws are missing from your model you bought as “Used but never opened”. eBay can be cruel sometimes.

Here is a comparison of what I removed from each side of the boiler compared to a stock 142.


The next step was to make major modifications to the running board as the air pumps pass through them. The issue here is that the running board is cast metal piece that can be very fragile. I accidentally bend mine during the cutting process and needed to straighten it out before continuing. Two cuts are needed here one is simple as it cutting off the slim section of running board for the stock pumps. The harder side is cutting a duplicate square cut out to match the other sides dimensions. These cuts were done with a razer saw, hobby knife and pliers.  After light sanding it was a simple matter of gluing them onto the opposite sides. Where there were gaps, I used strips of styrene 0.040. The annoying part here was that the running board has built in diamond plate some of which was sanded off curing the cutting. I later replaced this with a diamond plate 3d decal I found on eBay. More of this is detailed in my previous post.


With the major cutting done I moved on to body filling and final sanding. For this I used Tamiya Surface putty. This helped fill in small gaps and divest where parts were removed. These areas were sanded using varying degrees of fine sanding sticks I got from Hobby Lobby for cheap.

Following this I placed all of the metal components, (Frame, Wheels, Running Board, etc.) into a plastic tub filled with Super Clean Degreaser. I know this may seem odd but it was suggested online by a fellow modeler and tested it on a Tyco model to great effect. While these parts were soaking over night, I moved onto 3d modeling.

In addition to the new reverser listed in my previous post I also updated my 3D models of 3025’s cab and tender. Both have been available on my shapeways store for a few years now and are based on the original drawings used to create the actual items. The newer versions (Which will be uploaded soon) are more detailed and better fit the Bachmann model. (I guess there is a slight difference in sizes between Bachmann’s model and the real engines dimensions. Benefit of being able to measure the real engine for reference.)

The newest model to be created was the entire smokebox and headlight. I knew I as going to have to design a NH style headlight to fit the model but didn’t expect to remodel the entire smokebox as well. The short answer is that the stock smokebox was just too different that I needed to create it to satisfy my need to make it look accurate. (The smoke box will be available online as well soon.

While the parts were printing, I moved back to the parts soaking. 24 hours later the paint was peeling off, remaining paint was gently removed with a toothbrush. (Remember to wear appropriate safety equipment.)


With the old paint removed and the 3d parts cured it was time for primer and test fitting. I used Tamiya fine spray primer and quickly assembled the major parts. 3025 was looking more and more like its prototype.


This was soon followed with a coat of Tru-Color Engine Black. And graphite for the smoke box.

With the engine shaping up it was time to focus on the tender. The process was very similar to the cab and smokebox. Design, print, primer and paint. Hardest part was fishing the new LED headlight through the body and gluing the light in place. The tender body snaps on and off with built in clips so its very easy to access the electronics inside.


The rest is simple reassembly, super detail items and decals. All which can be seen in my Facebook group photos.  There is still some detail work to complete and replacement screws to find but overall, it has been a really enjoyable project and can wait to bring it to a few friend’s layouts as a special “guest power” maybe once I’m really happy with it I will bring it down to the Valley to pose with its1:1 scale inspiration.