Showing posts with label HO Scale. Show all posts

Tuesday, March 21, 2023

"There is a lot of Magic in a (Model) Railroad"

Hello everyone!! Been a while for a proper post here. Long story short a lot of personal and family things have happened that have left little time for model railroading and posting on the blog. But I am finally getting around to do it and oh boy it’s a big one. So, if you find this post interesting, please do leave me some feedback it would be greatly appreciated. Anyways on the meat and potatoes. 

     Back in September I took a trip down to Walt Disney World hoping to get a glimpse of our beloved “Grand Circle Tour” once again. For reference I have not been able to ride the WDWRR since October of 2018. I know that doesn’t seem long but that’s now over 5 years!! In which time I have been to WDW on at least 5 occasions. Needless to say, was missing the sights and sounds of the railroad. WDW wasn’t the same without hearing the whistle of the steam trains around the park.
I have many pictures with this sign....

    Sadly, for me I would not be lucky again and I returned home a week before the railroad started cast member testing. Although I can be happy with the fact that since this trip and as of the posting of this blog the WDWRR is back up and running with 3 of the 4 locomotives. (4th still out for refurbishment) Now I may not have seen the railroad running in person but it did motivate me to pick up on my HO scale WDWRR project.
WDWRR #1 & #3 in the process of disassembly.

    The original project started back in 2015. I was still in college and on weekends and school breaks I worked on converting 4 old Tyco/Mantua 4-6-0’s into the 4 engines of the WDWRR. This attempt at scratch building was not only my first attempt at a lot of new modeling techniques but use a lot off my very limited time, budget and novice skills. The models came out ok. I was proud of them then but looking back now they are a bit embarrassing. Their last public appearance was at the 2022 NERPM meet as a way of showing my progression of a modeler. Compared to my 3025 (version 1 R.I.P) & 0901 they were very crude. Since this original attempt; my time (to a degree) budget and skills have improved and I wanted to elevate these models to the level of my other models. This upgrade technically started in 2020 when I started to 3D model a more accurate cab. This model was created using measurements from the MTH 10-wheeler locomotive and scaling reference photos in a modeling program. (Remind me to talk about the MTH trains another time, very interesting story!) This model had its issues as well but it was easier to fix and would be worth it in the end. Next came the Boiler. The Basic shape is actually very simple but the challenge was trying to be as accurate/ prototypical as possible while still allowing for the original motor and frame. I say “prototypical” but I am already cheating as these engines are 3 ft. narrow gauge in real life and I am modeling them in true HO scale. So, they are as “prototypical” as I can be within reason.
(L to R) Original, 3D v1, v2, v3

    The photo above shows the evolution of the boiler. The furthest left is the original; stock Tyco shell with some Bondo to help smooth out the tapered boiler sections. The second is v1 of the 3D printed boiler. This version included a modeled boiler, boiler bands, smokebox and detailed back head and cab details. In the original Tyco model this was on a separate plastic piece that would stick out the back of the cab. The Disney engines controls and fire box stop about halfway through the cab, so I modeled it the “correct” way. This however pointed out a problem which we will discuss later. 

    v2 improves the design by adding the stepped section to the cab, lowered fire box, handrails air pump bracket and the back frame which attached to the original models frame in a similar way. This was almost perfect except for the hand rails. They where too thin and failed often. (Might try these again but might become a separate item.) Finally, the last, v3, is the same as v2 but with drill holes for the handrails rather than including them. Now remember that little issue I mentioned before about the “accurate” back head location? Well, the reason the original Tyco model had this as a separate part and for its length was to allow room for the original motor.
Original Tyco/Mantua motor scale.

    This motor is gigantic in relation to the model and would be sticking out of the boiler and almost to the roof of the cab. So, what am I to do? Admit defeat and modify or even remove the cab details to accommodate the motor? No, not this time. Besides I wanted to change out the motor for something more modern anyways. The issue was, where do I find one that could be useful to me? Faced with this task like this I turn to my go to parts shop. The Bachmann Trains parts store.

     Now I know some people have their opinions on Bachmann but their models have always been great runner for me and I find that their models host a wide range of motor designs. My first choice was from their 0-6-0 saddle tank engine as it has a smaller smooth running motor that could be hidden in the boiler. Unfortunately, this is discontinued and parts are not available. I then turned to some other little engines I have, Thomas and Percy.

    Cast your minds back to a previous post about turning these models into “dummy units”. Because of this I removed their motors. While they didn’t run, they provided me with a good size template for what’s needed.

 
Bachmann Percy Motor Test Fit.

    The motor would need to be angled to mesh with the original gear on the drive wheel. This angle was originally achieved by a metal frame that held the original motor at the angle needed. My solution was simple, but tedious. Design a cradle for the Percy motor that could be screwed into the frame. Well as my luck would have it, Bachmann updated their the Percy motor since my old model was made so I had make a cradle to hold the new motor. (Just ordered the remaining motors yesterday and they seems to have changed motors again). 

New Cradle installed.

    Despite this, the "new" motor worm gear meshed will with the original drive axel. Let’s hope the newest version of the motor does the same otherwise I'll need to become a bit more creative with my “heart transplant”. For now I am going to secure the new cradle to the existing frame using a ¼” 2-56 screw; a growing favorite of mine, along with a piece of electrical tape to help hold it in place. 

"New" Percy Motor In Cradle.

     The last body modification made to the original model was to remove the original cast cowcatcher. While close, it doesn’t meet my “realistic” design approach. So, with the help of a razer saw and a Dremel tool, off it went. 

Removing the old cowcatcher.

What follows this is a lot of 3D modeling and printing. During this time, I have created the two domes, smokestack, smokebox door, bell, whistle, air pump, cowcatcher and headlight. These pieces have all me test printed and primed but are not nearly complete. I am still working on the designs and I am waiting on a new type of resign. The company claims it will reduce layer lines visibility and be possibly faster and stronger prints. But only time will tell. 

Test fit of the WDWRR#1 3D printed parts.

    In the mean time I am very happy with my progress and I hope that I will move onto the painting phase. I am excited to see this project turn out and I'll be sure to keep you all posted on any future updates. But till then, Ill borrow the words of a certain mouse. See ya real soon!!

Monday, March 14, 2022

Monday Modeling Update - Slight Buyers Remorse - March 14th, 2022

 Over the last few months there has been a lot going on in and out of the workshop. There have been some field trips to fellow model railroaders, Bob Murphy, Chris Adams and Bill Schneider home layouts for some amazing operating sessions. Some 3D modeling projects, some of which were seen on my Facebook page, some not shown yet!

However by far the most time consuming task taking most of my time recently is the result of a very impulsive eBay win. 


The listing was for 6 HO scale locomotives, 4 of them Bachmann Spectrum models. Now say what you will about Bachmann Engines. I have always been a fan of the company since first starting in the hobby. To me they were a very good middle of the road manufacture that had very decent steam locomotives for under $300 dollars.  Making them the perfect gateway locomotives for me into DCC and kit bashing. 

I won the bit for around $200 at the end of the day which was a bargain in my eyes. Especially since the 4 Bachmann engines would be roughly $700-$800 new. Now I knew the seller stated that the models were in need of repair and most if not all of the decoders were removed. Not the end of the world since 2 of the engines might be cannibalized for future projects. 

However when they arrived it became clear that the locos were in much rougher condition. Not only were the decoders removed but most to all of the wiring was as well. Plugs were missing and/or destroyed.  So started my journey of taking each one completely apart and basically rewiring all back to DC operations. Oh did I mention that all of the headlights were burnt out LEDs..........................

Wednesday, September 29, 2021

Pushing the Limits of 3D Printing.

Long time no post.  Hopfully this is the start of more posts and updates as some personal things get wrapped up and there is more time for model railroading. Im still working on my Valley History Project but It was nice to be able to break up the work by having different things to focus on. 

The latest thing that has grabbed my attention is another request from fellow modelers and the project will and still is pushing the limits of my 3D Printer.

The request came in a few weeks ago. Looking for a replacement part for a Atlas S-1 diesel locomotive. Specifically for the ones used on the New Haven (For the DEY-3).


Hard to see but the grill in question is located under that metal walkway and above a large fan unit.  The Atlas models come with a metal grid, almost fence like, detail piece to simulate the grill. On the NH these grills were actually a series of shutters, very similar to the one found on the side of the locomotive's hoods.

The bad news for the project was that there was little to no reference photos to help base a model after. The good news is that we had a small team working together to discuss and develop the model based on small bits of information we all had/could find.  As one put it " it took a village" to design a part no bigger than 13mm square.

By far the best tool we had to design this model was the locomotive itself. This allowed us to get the base outer dimensions which is arguably the most important needed to start designing. The other tools were reference photos and a bit of guess and checking. From photos I was able to make a guess that there were about 22 shutters in total. 

Using this I started to create my first model using 0.015 thick fins and reducing the shutter count to 20 in an attempt to have prototypical gaps between fins. They were also angled at about 45 degrees to simulate that the fan is running but not at full throttle.


The 2 grills on the right were the first print attempts and while looked nice and prototypical count wise, were too small for my printer to actually provide gaps in-between them. Of course we could have planted a flag and called it done, but that urge to find a way to have both elements pushed me further. Which in tern lead the the examples on the left. Same size shutters but reduced to only 16 count.This allowed the gaps to be viable but looked more like a storm drain rather than a series of shutters. 


Here are the same two with a quick black wash and placed on the actual model. Notice how much nicer the one on the right looks compared the left. However what was found next really pushed me to create a happier mix of the two.


Above is a picture of an actual grill we are trying to create. This photo helped answer so many unknowns that it pushed me to create one more version (V5.0 by this point). 


Which brings the story to the present. Above is the latest test prints and as you can see they are closer together and have better gaps. The lower right one had some errors but one can argue that its seen a bit of weathering like the prototypes. Im sure we are not complete with these grills so stay tooned for more updates and future project.!


Monday, February 1, 2021

Swapping sides - Working on my HO scale 3025

Well this weekend would have been spent up at the Big "E" fair grounds exploring the four buildings packed full with all things trains and model railroading. But like with most thing during this pandemic its was shelved for another time. It was not all for loss though as there was over 12+ hours of live stream presentations, clinics, and product announcements at the Virtual Amherst Railroad Hobby Show. 

It was the perfect thing to put on in the background as I spent most of the weekend working on model trains things. I spent most of Saturday 3D modeling parts for my HO scale Walt Disney World Engines, which you can see the results of on my Facebook group.  But the biggest find of the weekend was part of my HO scale 3025 model!!!

I'm a bit ashamed to admit this but it was ever since the move to the new house I have not fully unpacked all of my model train things. While looking for items for the WDWRR project i found a small green box that happened to have about 80% of my 3025 models.  It gave me such a rush to find these items that I put the Disney trains aside and took out the parts of  to see what I had and what the next steps were.

Now the Bachmann SY models are very accurate to the real life locomotives which is a blessing as it means many if not all of the major details were included in the base model. Accurate as the model is there is one major issue when it comes to converting the model into 3025.  

The SY locomotives were created by the Tangshan Locomotive works in Tangshan, China. Chinese railways are "left-hand" drive, meaning that the engineer sits on the left of the cab and the fireman on the right. This is opposite of what is common practice here in the USA. This means that components of the engine that drive the locomotive, like the reverser, are alongside the left side of the boiler. The Bachmann model depicts this perfectly. So what my issue? 3025 and its predecessor 1647 were modified to be "right-hand" drive!!!!!!

So what does this mean for my model? I have to carefully cut off and remove many of the modeled in and separately applied details and reattach them to the opposite side of the model. A simple task on paper but increasingly harder in practice. 

In the following pictures you can see my 3025 boiler compared to a stock Bachmann SY to show what I removed.


Nothing terrible yet until you examine the parts I cut off. Lets take the reverser for example. (please forgive me if this is not the actual name of the part)  the way the model is designed it is hollow on the back side that would normally face the engine. Meaning I can simply spin the part 360 degrees and re-glue it as I had hoped to do. So now I have a part that is not longer usable and now replacement to fit on the other side. What to do? Well take measurements of the existing part and start to 3D model my own part. It was during this time I took the liberty to "upgrade" the part as well. The Bachmann version used basic shapes and mine was a little more.....rivet counter level........


 No telling if this will print the way I want but that's a story for another time.

My next item to relocate what the air pumps. ( Again please don't be too critical if i got he names wrong) This would fit into a gap in the running board on the right or East side of the boiler. In order to move the pumps to the West side a new gap would need to be cut out. This was the job for the hand held razer saw. 


Carefully I made my cuts for the new gap as well as cutting out the existing running board strip. 


My plan was to use the off-cuts on the opposite sides to fill gaps, basically swapping sides. and after some filling and a bit of 0.04 styrene sheets the new running board was super glued together.


And here is where I stopped for the night. Not the most things done off the list but a good start on some of the trickiest parts. I have learned that Model Railroad projects take time and should not be rushed. It one of the main reasons why I'm redoing my WDWRR models. Slow and steady will win the race on this one and I hope that it ends up being well worth it in the end. This is one of the first times in the new house I have sat down and worked on a model in a proper workshop and it felt amazing. Hopefully during this pandemic and the winter months I can get more work done on the trains. But only time will tell, but for now I need to prepare for the expected 16" of snow we are getting tonight. 

I hope you enjoy reading this update and I hope you all are staying safe and healthy, 

Thursday, June 4, 2020

Old Friends get a well deserved makeover - Creating HO Scale DOWT Dummies

After the completion and release of my 0901 shell. I was lucky to be able to sell a few of them as well. I used to sell a few odds and ends on Ebay, so I had some shipping supplies pack away. As I was digging through boxes I came across these little guys.


These guys are the remains of a Bachmann HO scale Thomas and Percy. They are missing parts and more importantly their faces. Scary as these might be they are actually some old friends. Cast your mind back a few months to when I restarted this blog I made a series of posts about how I had to stop regularly going to visit my old model railroad club at Masonicare.

These engines where the first Thomas and Percy we got for the club layout.  They ran for a number of years for who knows how many miles. They took a few bumps,  falls and  lots of confusion and delay. Eventually there motors failed and they were taken off the layout. They were the most popular engines on the layout by far and the train guys deemed it necessary to replace the engines.

As they were destined for the scrap yards I elected to take them home instead.  I removed the motors and greased the wheels in order to help make then free rolling. Back then I didn't know what exactly I would do with them. But I knew that they would be become very useful again one day.

And today is that day!!

First a bit of backstory for you all. For many years Thomas has come to visit us here in CT; helping to pull heavy trains on the Valley.  I can remember my Nana and Papa bringing me there for a Day out with Thomas. Originally there it was the live steam Thomas that travels around the US for these events. However in recent years the "dummy" non-powered versions of Thomas has been visiting the Valley. There is a bit of debate about which is better, but personally I prefer the new "dummies" because it is more accurate to the TV series models. In addition, since 2015, Thomas has brought his friend Percy to visit us here as well.

As you may already know from my previous post I have been working on creating models of unique engines and rolling stock; mainly the ones found on the Valley. But what does this have to do with those old models you may ask?  Well I decided I would try to make HO scale replicas of the Day out with Thomas (DOWT) "Dummies" that come to the Valley each year.

One would say this is not needed as Bachmann make fully working models of the engines, but they are not correct to the Dummies, nor their TV show versions ether.  First lets look at Thomas; the factory bachmann model has the overall shape correct but there are things like the cab windows, the face and overall height that are incorrect for the dummies.  If you look at this photo:


 You can see the Thomas Dummy coupled to 3025. Notice that Thomas is significantly shorter, this is due to the dummys wheels. The overall body shape is correct but the wheels are a bit small making the dummy shorter than a one of the Valley's coach cars. Compare that to this photo of the Bachmann Thomas next to a Athern heavyweight car.

Both Thomas and Percy are the same height or taller than the coach car.  This is an issue I will have creating these models. Because I want to use as much as the factory parts possible, mainly the wheel sets. 

So I decided that I will try to fix these two issues at once using 3D printed parts. I started by creating a slightly shorter shell for Thomas, correcting the window issues found in the factory model.
I also starting to think ahead for "super details opportunities". Like creating a hole in the bottom of the smoke box to install a smoke machine as well as room for possible future DCC sound, while still leaving room to have the cab be open and not blocked off by black plastic like the factory model has.
Its just a start, but I thought it would be a fun project to revive some old models from the past and give them a new working life.


Monday, May 11, 2020

Re-visiting my first scratch-building project - HO Scale WDW


I may have mentioned this before but have always loved Disney. The movies, the parks, but especially the trains. Walt Disney himself had a fascination with train even building a live steam railroad in his backyard. So mixing my love for trains and Disney was very easy to do.  Case and point:
12 year old me in the Cab of WDWRR #1 " Walter E. Disney"

So during my time at college I started to build HO scale replicas of the 4 engines that you can find at Walt Disney World in Florida.  I took a bit of modelers licence because the real versions are 3 ft narrow guage but converting them down to HO scale was simpler and was what I modeled. To put it short the end result was 4 kitbashed and scratch- built engines made from tyco/mantua 4-6-0 models. They were very crude but at the time I was happy about it.   However looking back at them now, they are a bit hard to look at.  The paint is bad and there are obvious areas where I rushed to meet a deadline that never existed in the first place.  But why bring this up?

After modeling so much of the Valley's equipment I wanted to do something different to give me a bit of mental block from the same projects.  Digging in a box at home I found these old WDWRR engines and thought how can I fix these?

So I started with something simple that can be used on all 4 engines with little modifications, the cab. This was created based on online photos, scale measurements, and some reference photos I took of the engines when i was last at the parks and after about a week of working on it in between work and other projects here is the result.


So far so good I think. The goal would be to created full 3D models, in HO scale, that I can print out at home using my Photon S resin printer for each of the engines. I am currently thinking of re-using the tyco motors and wheel sets but that may change.

Thursday, April 16, 2020

Covid Cabin Fever and finding created ways to use this time to help a fellow modeler

One of the best thing about this hobby is meeting others within it. I have mentioned before in posts here about my real start with model trains and the "old guys" from the Masonic Train room that helped me learn most of what I know.  Its people like this that are willing to share their Technics and skills that help pass this hobby on to others and help grow the greatest hobby in the world. Being able to create these models is a way that I can pass along the skills I have learned and to share there results with others in the community.

A few years ago I came across another blog and web site called "The Valley Local".  This is a very dedicated detailed blog covering the layout progress of Chris Adams. I have mentioned him before and is one of my inspirations for creating this blog. I was very honored to be able to visit Chris' layout, on my birthday of all days, and was even able to be apart of his operating session. It is a beautiful model of the CT Valley Railroad in the 50's and has become one of my favorite layout because of it being so close to home. But why am I bringing all this up again?

During the craziness going on in the world due to Covid-19 I am currently working from home. I am very grateful for being able to do this and I am using this opportunity to help others while I am home during lunch and what would be my normal communing time.  While I am working in my office I have by Dremel 3D20 making ear guards that I am donating to local medical and essential employees. More information here on my Facebook post.

I have also been doing a lot more 3D modeling as a result of being inside more as well. This is where Chris's layout comes in. I reached out to him to see if there was anything i might be able to create and 3D print for his layout. As I put it, something to fight off the cabin fever of this pandemic and Chris was quick to respond!!

 It turns out there is a specific grade crossing sign that he was looking for that were all along the Valley during his era. Through his own research and bit of my own, no manufacture make this particular grade crossing sign.
Zoomed in picture of the sign in question. "Max Miller Collection" 
This was right up my ally and a challenge that I love to tackle. Something "rare" or so specific that no one has heard of or made before.

After discussing it with Chris a bit further I started by scaling the photo to get some basic dimensions and guesses on size. I used the photo the two photos below to scale something I knew the dimension of. In this case the telephone pole and the width of the rails.
Great photo of Then and Now "John Wallace Collection"

Grade crossing in Middletown, CT. "Max Miller Collection"
This dimensions where used to create a drawing on paper first.  This is purely for my own sanity and helps me jot down any other notes or important information regarding to the project.
My hand written madness

This drawing also shows by first attempt at how I thought the sign was connected to the post. Only so much you can guess at when you are zooming into a photo. But another, clearer photo made me rethink how it was mounted to the wooden post.

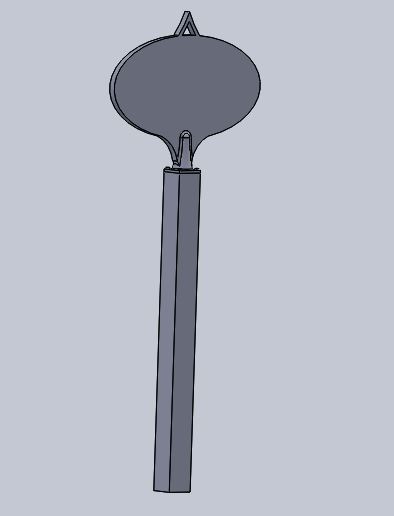
Using these measurements I created my first pass at the sign 1:1 scale in the CPU. I do this for two reasons: 1.) Using 1:1 dimensions is easier as I don't need to convert anything & 2.) the Final model can, theoretically, be scaled down to fit any scale. Here is the current, final product!!
Front view

Back View
Now in no way is this complete and is basically a first draft of the model.  What I really need is a clear photo of the sign or even better the actual dimensions of the sign. But where am I going to find something like that?!?!?!   Thankfully Chris was way ahead of me and found someone that might just have what we are looking for. 

More to come, but until then, see ya real soon!!