Back in September I took a trip down to Walt Disney World hoping to get a glimpse of our beloved “Grand Circle Tour” once again. For reference I have not been able to ride the WDWRR since October of 2018. I know that doesn’t seem long but that’s now over 5 years!! In which time I have been to WDW on at least 5 occasions. Needless to say, was missing the sights and sounds of the railroad. WDW wasn’t the same without hearing the whistle of the steam trains around the park.
 |
| I have many pictures with this sign.... |
Sadly, for me I would not be lucky again and I returned home a week before the railroad started cast member testing. Although I can be happy with the fact that since this trip and as of the posting of this blog the WDWRR is back up and running with 3 of the 4 locomotives. (4th still out for refurbishment) Now I may not have seen the railroad running in person but it did motivate me to pick up on my HO scale WDWRR project.
 |
| WDWRR #1 & #3 in the process of disassembly. |
The
original project started back in 2015. I was still in college and on weekends and school breaks I worked on converting 4 old Tyco/Mantua 4-6-0’s into the 4 engines of the WDWRR. This attempt at scratch building was not only my first attempt at a lot of new modeling techniques but use a lot off my very limited time, budget and novice skills. The models came out ok. I was proud of them then but looking back now they are a bit embarrassing. Their last public appearance was at the
2022 NERPM meet as a way of showing my progression of a modeler. Compared to my 3025 (version 1 R.I.P) & 0901 they were very crude.
Since this original attempt; my time (to a degree) budget and skills have improved and I wanted to elevate these models to the level of my other models. This upgrade technically started in 2020 when I started to 3D model a more
accurate cab. This model was created using measurements from the MTH 10-wheeler locomotive and scaling reference photos in a modeling program. (Remind me to talk about the MTH trains another time, very interesting story!) This model had its issues as well but it was easier to fix and would be worth it in the end.
Next came the Boiler. The Basic shape is actually very simple but the challenge was trying to be as accurate/ prototypical as possible while still allowing for the original motor and frame. I say “prototypical” but I am already cheating as these engines are 3 ft. narrow gauge in real life and I am modeling them in true HO scale. So, they are as “prototypical” as I can be within reason.
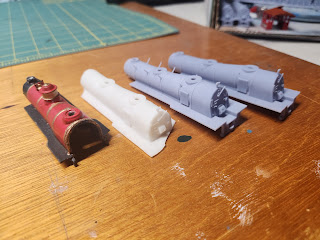 |
| (L to R) Original, 3D v1, v2, v3 |
The photo above shows the evolution of the boiler. The furthest left is the original; stock Tyco shell with some Bondo to help smooth out the tapered boiler sections. The second is v1 of the 3D printed boiler. This version included a modeled boiler, boiler bands, smokebox and detailed back head and cab details. In the original Tyco model this was on a separate plastic piece that would stick out the back of the cab. The Disney engines controls and fire box stop about halfway through the cab, so I modeled it the “correct” way. This however pointed out a problem which we will discuss later.
v2 improves the design by adding the stepped section to the cab, lowered fire box, handrails air pump bracket and the back frame which attached to the original models frame in a similar way. This was almost perfect except for the hand rails. They where too thin and failed often. (Might try these again but might become a separate item.) Finally, the last, v3, is the same as v2 but with drill holes for the handrails rather than including them.
Now remember that little issue I mentioned before about the “accurate” back head location? Well, the reason the original Tyco model had this as a separate part and for its length was to allow room for the original motor.
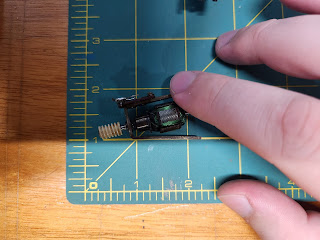 |
| Original Tyco/Mantua motor scale. |
This motor is gigantic in relation to the model and would be sticking out of the boiler and almost to the roof of the cab. So, what am I to do? Admit defeat and modify or even remove the cab details to accommodate the motor? No, not this time. Besides I wanted to change out the motor for something more modern anyways. The issue was, where do I find one that could be useful to me?
Faced with this task like this I turn to my go to parts shop. The Bachmann Trains parts store.
Now I know some people have their opinions on Bachmann but their models have always been great runner for me and I find that their models host a wide range of motor designs. My first choice was from their 0-6-0 saddle tank engine as it has a smaller smooth running motor that could be hidden in the boiler. Unfortunately, this is discontinued and parts are not available. I then turned to some other little engines I have,
Thomas and Percy.
Cast your minds back to a previous post about turning these models into “dummy units”. Because of this I removed their motors. While they didn’t run, they provided me with a good size template for what’s needed.
 |
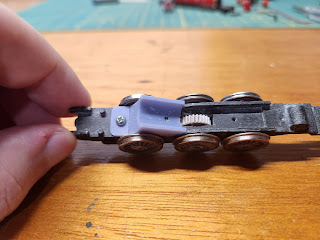
| Bachmann Percy Motor Test Fit. |
The motor would need to be angled to mesh with the original gear on the drive wheel. This angle was originally achieved by a metal frame that held the original motor at the angle needed. My solution was simple, but tedious. Design a cradle for the Percy motor that could be screwed into the frame. Well as my luck would have it, Bachmann updated their the Percy motor since my old model was made so I had make a cradle to hold the new motor. (Just ordered the remaining motors yesterday and they seems to have changed motors again).
 |
| New Cradle installed. |
Despite this, the "new" motor worm gear meshed will with the original drive axel. Let’s hope the newest version of the motor does the same otherwise I'll need to become a bit more creative with my “heart transplant”. For now I am going to secure the new cradle to the existing frame using a ¼” 2-56 screw; a growing favorite of mine, along with a piece of electrical tape to help hold it in place.
 |
| "New" Percy Motor In Cradle. |
The last body modification made to the original model was to remove the original cast cowcatcher. While close, it doesn’t meet my “realistic” design approach. So, with the help of a razer saw and a Dremel tool, off it went.
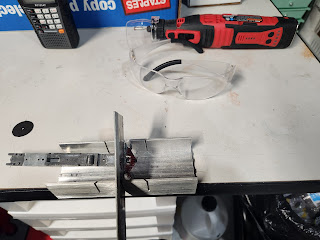 |
| Removing the old cowcatcher. |
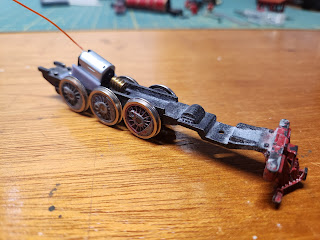
What follows this is a lot of 3D modeling and printing. During this time, I have created the two domes, smokestack, smokebox door, bell, whistle, air pump, cowcatcher and headlight.
These pieces have all me test printed and primed but are not nearly complete. I am still working on the designs and I am waiting on a new type of resign. The company claims it will reduce layer lines visibility and be possibly faster and stronger prints. But only time will tell.
 |
| Test fit of the WDWRR#1 3D printed parts. |
In the mean time I am very happy with my progress and I hope that I will move onto the painting phase. I am excited to see this project turn out and I'll be sure to keep you all posted on any future updates. But till then, Ill borrow the words of a certain mouse. See ya real soon!!


